
Monitoring Windows Machines
See Also
Introduction
This document describes how you can monitor local services and attributes of Windows machines, such as:
- Memory usage
- CPU load
- Disk usage
Publicly available services that are provided by Windows machines (HTTP, FTP, POP3, etc.) can be monitored easily by following the documentation on monitoring network services.
NOTE
These instructions assume that you've installed Naemon according to the quickstart guide. The sample configuration entries below reference objects that are defined in the sample config files (commands.cfg, templates.cfg, etc.) that are installed if you follow the quickstart.
Overview

Monitoring private services or attributes of a Windows machine requires that you install an agent on it. This agent acts as a proxy between the Naemon plugin that does the monitoring and the actual service or attribute of the Windows machine. Without installing an agent on the Windows box, Naemon would be unable to monitor local services or attributes of the Windows box.
For this example, we will be installing the NSClient++ addon on the Windows machine and using the check_nrpe plugin to communicate with the NSClient++ addon. The check_nrpe plugin should already be installed on the Naemon server if you followed the quickstart guide.
Steps
There are several steps you'll need to follow in order to monitor a new Windows machine. They are:
- Install a monitoring agent on the Windows machine
- Create new host and service definitions for monitoring the Windows machine<
- Restart the Naemon daemon</
Installing the Windows Agent
Before you can begin monitoring local services and attributes of Windows machines, you'll need to install an agent on those machines. I recommend using the NSClient++ addon, which can be found at NSClient++. These instructions will take you through a basic installation of the NSClient++ addon, as well as the configuration of Naemon for monitoring the Windows machine.
- Download the latest stable version of the NSClient++ addon from NSClient++
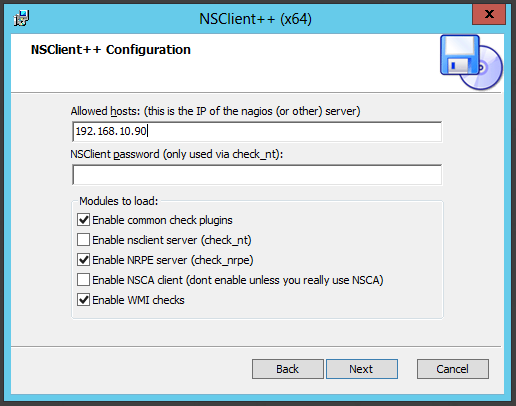
- Install NSClient++ and use the "Complete" setup type to make sure you got all features. On the next page use the default path for
nsclient.iniand make sureInstall sample configurationare checked - Enter all hosts that are allowed to connect to NSClient++, separate multiple IP's with
,. Make sure to check the following:
- "Check Enable common check plugins"
- "Enable NRPE server (check_nrpe)"
- "Enable WMI checks".
NSClient++ should be installed as a service and start automatic.
- This should be enough to start with some basic Windows monitoring.
Configuring Naemon
Now it's time to define some object definitions in your Naemon configuration files in order to monitor the new Windows machine.
Hostgroup
We will start to create a basic hostgroup for some generic tests for all Microsoft Windows machines.
Open the /etc/naemon/conf.d/hostgroups.cfg file for editing.
Add the new hostsgroup definition for the Windows hostgroup that you're going to monitor.
vi /etc/naemon/conf.d/hostgroups.cfgAdd the following
define hostgroup {
  hostgroup_name                 microsoft-windows
  alias                          Microsoft Windows hosts
}
Command
Make sure you have a check_nrpe command configured, if not. open /etc/naemon/conf.d/commands.cfg for editing
Add the new command definition for the Windows hostgroup that you're going to monitor.
vi /etc/naemon/conf.d/commands.cfgAdd the following
define command {
  command_name                   check_nrpe
  command_line                   $USER1$/check_nrpe -H $HOSTADDRESS$ -c $ARG1$
}
Service
We will now add three basic services - Memory, CPU Load and Hard drives
Add the new service definition for the Windows hostgroup that you're going to monitor.
Open /etc/naemon/conf.d/services.cfg for editing
vi /etc/naemon/conf.d/services.cfgAdd the following
define service {
  service_description            Memory
  hostgroup_name                 microsoft-windows
  use                            generic-service
  check_command                  check_nrpe!alias_mem
}

define service {
  service_description            Hard drives
  hostgroup_name                 microsoft-windows
  use                            generic-service
  check_command                  check_nrpe!alias_disk
}

define service {
  service_description            CPU load
  hostgroup_name                 microsoft-windows
  use                            generic-service
  check_command                  check_nrpe!alias_cpu
}
Host
We have now defined a hostgroup, command and services. Let us complete this and add a Windows host to monitor
Add a new host definition for the Windows machine that you're going to monitor. Change the host_name, alias, and address fields to appropriate values for the Windows machine.
Open /etc/naemon/conf.d/hosts.cfg for editing
vi /etc/naemon/conf.d/hosts.cfgAdd the following
define host {
  host_name                      windowsserver
  alias                          My Windows server
  address                        192.168.10.200
  hostgroups                     microsoft-windows
  use                            windows-server ; Inherit default values from a Windows server template (make sure you keep this line!)
}
Add more hosts and services
It's now very easy to extend your monitoring with more hosts or services. If you want to add a new Windows host, simply create a new host definition and define microsoft-windows as hostgroups.
If you want to add more services to microsft-windows hostgroup simple add new services and define microsoft-windows as hostgroups_name
Reload Naemon
You're done with modifying the Naemon configuration, so you'll need to verify your configuration files and restart Naemon.
If the verification process produces any errors messages, fix your configuration file before continuing. Make sure that you don't (re)start Naemon until the verification process completes without any errors!
naemon -v /etc/naemon/naemon.cfgReload Naemon to activate new changes
service naemon reload